One of a kind Chevy van
- Condition: Used
- Make: Chevrolet
- Model: G20 Van
- Type: G20
- Year: 1990
- Mileage: 168760
- VIN: 1GBEG25K7L7134799
- Color: Burgundy
- Engine size: 350ci
- Number of cylinders: 8
- Fuel: Gasoline
- Transmission: Automatic
- Drive type: RWD
- Interior color: Red, gray, black
- Vehicle Title: Clear
- Location: Live Oak, Florida, United States
Description
ATTENTION "SPECIAL REDUCED PRICE"
1990 Chevy Van G20
~Interior~
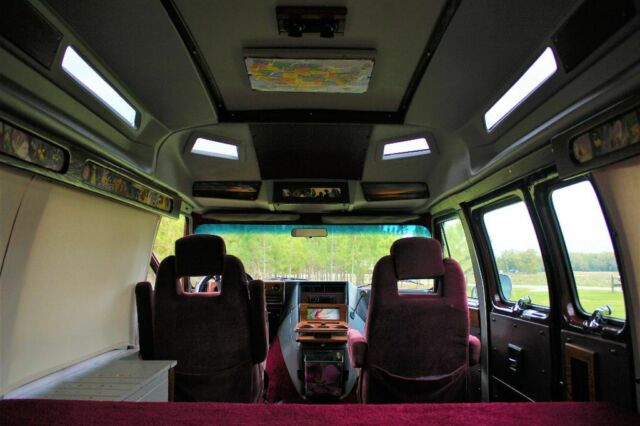
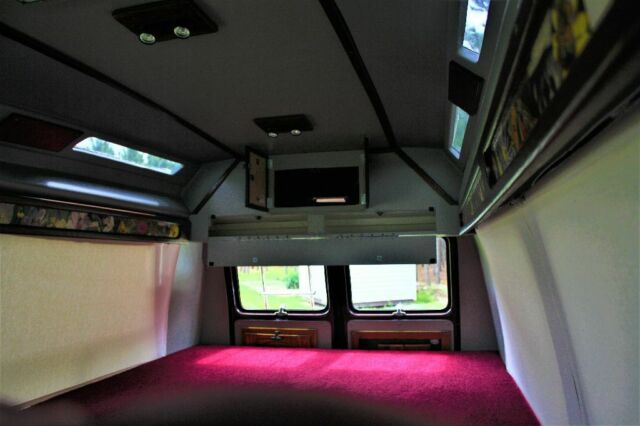
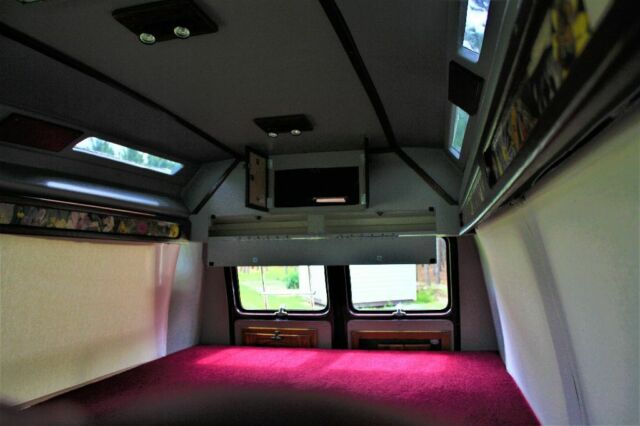
In 1990 U.S Conversions (USC) was just one of many conversions company taking on the task of converting standard cargo vans into (Conversion) what we now call Campervans. We should have taken a photographic documentary of this project when i started, but we totally got consumed. Although, most of what you see will be original, just refurbished. Here are a few example to look for in the pictures...Ceiling plastic shroud's, all wood on all doors (which has been replaced with 1/4" lauan panels) oak trim, light bars running down each side inside, and all wood on the cowling. As you read on, we will explain what's new and refurbished.(SP=*see pic)
In just two months from now it will be two years since we begin. We had to completely demo the inside and kept what we could salvage. "ALL" interior wires were inspected, repaired and loomed. During this time we ran wire for two lights (110) one (12 volt) and 4 receptacles in which 3 are for (110) and one for (inverter 12volt to 110) Johns Manville R-13 rolled insulation was put on the ceiling, in the walls and (JM) foil faced foam on the floors, wheel wells and any storage areas that you see. Any smaller spaces that looked like trouble we filled with Great Stuff.
Lets talk about the 6 skylights that adorn the topper. Upon inspection we found that two of had been leaking for some time, no wonder the ceiling was rotten. The topper didn't have anything kind of protectant, so we gave it a fiberglass approved primer. On the freshly primered fiberglass, a bead of marine approved silicone was applied to all skylights with great success. The three plastic shroud's(SP) were in bad shape due to the heat. Our thought was to get new ones, but the company went out of business a year or two after. We sat out to refurb ourselves.
During our research on plastic paints, our hope was gaining momentum with some new products on the market . With a little hard work and a lot patience they look brand new. Some cracks couldn't be fixed as they are in inconspicuous places and we didn't want to press our luck with 29 year old plastic. Just under those shroud's (SP) are two lights bars ( which by the way are oak and have been sanded, stained and 3 coats urethane) that (USC) had faced with see through plastic so its lights would shine through. We made our own inserts with pictures and we adapted two (110) fluorescent lights on the wall behind them, that are hardwired. Switch can be found on the face of the unit. Light bars can be removed to make any repair.
Next we built a storage area (SP) where the rear air conditioning was originally. It was designed for a CPAP machine and storage. I say this because in the top section we have two receptacles one for 110 (shore Power) and the other (Inverter) 12volt. Down below was designed to be use for CPAP supplies. Coming forward the center of the ceiling has 1/4" lauan plywood (all 1/4" plywood, and any white wood throughout the van as been primed and finished with quality Sherwin Williams Paint) with two new "2" bulb Aircraft 12 volt directional lights. (SP) Above dash is another 1/4" piece of plywood that we covered with marine grade vinyl. We wanted to tie the ceiling and the side cargo doors and driver and passenger doors, and sun visors all together. Rear cargo just got painted. (SP) All the doors mechanisms have been removed and cleaned and greased with marine approved silicone. This means that all door handle linkage, lock linkage, window crank linkage and anything else you can think of we did. Rust is and has never been a friend of ours. One other repair we made while fixing the doors, was new window channel run kit, which covers both driver and pass doors.
If your familiar with the "wing window", this van came with. Both have been removed and rubber reconditioned and the non-locking system removed and the locking ones put in its place. It was so easy to get in with the non-locking ones back in the day ha ha !!! None of the electrical locking systems (rear cargo, side cargo, or driver and pass) or the electric window system (driver or pass) worked. We took it all out and didn't put it back for the simple fact it was expensive and we like old school. The key works all the doors just fine after greasing them up. We had purchase manual window regulators cranks for driver and pass and retro fit them in. Wouldn`t do that again!!!!
The dash had that molded plastic that was cracked and coming off, so we took it off and customized it our way. Let me tell you, that if you take your time, painting plastic can be achieved with great results. (SP) Before setting it back we fixed climate control center, had cluster rebuilt, new headlight switch, some air vents repaired, new heater core and hoses replaced, and the "Actuators" have been repaired. They are responsible for opening and closing vents like... from hot AIR to cold AIR. We put a cheaply radio w/speakers in. A new rear view mirror, new steering wheel. Ordered an original cigarette lighter for the dash and charging port for the cowling. The original cowling mounted map light (SP) ( which we have a spare) we put back. Since this was custom, we had to put a new Blue Sea System 6 circuit 12 volt fuse block under dash to run the aforementioned. We had custom made curtains with a Velcro release system sewn onto the curtain and the other fastened to the wall.
Both sets of cargo doors windows have been disassembled, rubber reconditioned, new seals at the hinged areas and reassembled. At one time they leaked, but not now. The 3 large windows have been removed repaired. We seated inside with butyl tape and new aluminum hardware, and along with the exterior edge we gave it a high density weather stripping. No leaks
El Capitàn seats are original, but they are the two from the second row seating. We thought that they would be just fine for the time being. They were dry cleaned and all components greased. These seat will recline and move 360 degree. The seatbelts were in pretty bad shape, beyond repair. We kept the best one to use for reference just in case we need to match up. The local parts store had D.O.T. approved lap belts.
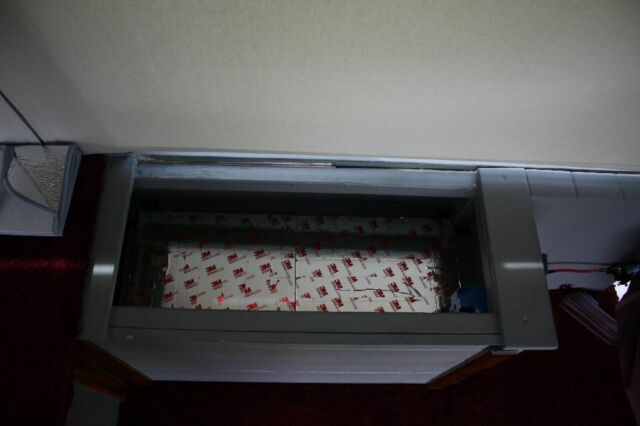
To continue with the (electric) conversion part of this van, the outlets (110) and (12volt) in the storage area runs to the CPAP area. There waiting is the Xantrex Prowatt SW 600 inverter (included) located just inside storage area under bed. The battery box you see was built where the entertainment center used to be.(SP) Box was built to accommodate two group 27 agm batteries (not included). It will also double as a seat with a little bit of storage underneath the lid. All direct current (d/c) wires are 6 (awg) with two 70amp circuit breakers and one Blu Sea System Automatic Charging Relay. The (110) wires are standard household wire.
As much as we both like a big bed, this one was taken to the limit, by that we mean its 77" long x 71" wide. A Queen is (60" x 80") and a King is (76"x 80"), so it`s a big bed. Its all the space we wanted to give up. We found a company that would make any kind of mattress we wanted, unfortunately its located in Wisconsin, lol !! The materials used in construction is made up of 2x4 frame and galvanized steel hi-hat furring channel that we covered with oriented strand board (OSB) and carpet. Custom made access door with feather handles and clear rosettes for easy access to storage area.
~Exterior~
Our new neighbor informed us he been painting car for years. Didn`t think it would be this easy for us, so we ask him what we could do to help him out? He said, if you do all the prep, I will paint it for free if you by materials. Wow...we said this was to good to be true. Well, after five days of H E double hockey sticks later, it went to the booth. A month later it came home and lets say he didn`t do what he said. It did get a single stage paint job. Overall its not a bad job.
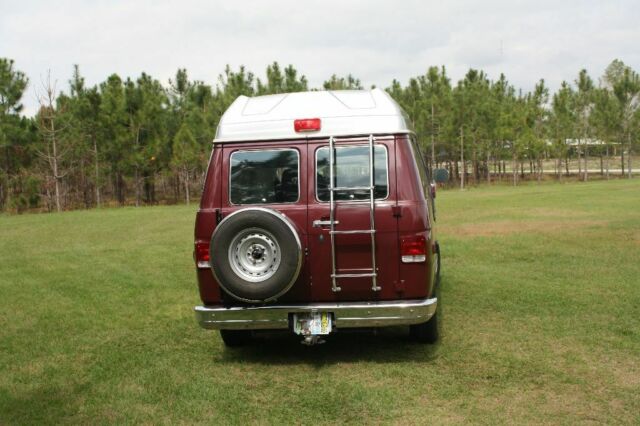
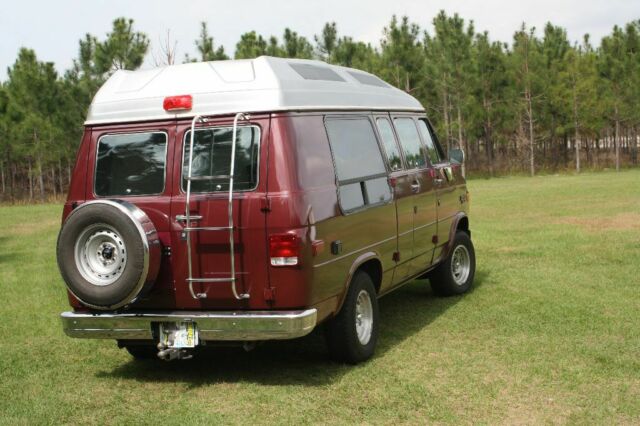
Next, lets talk about the topper. Remember I mentioned that it leaking from the skylight windows, well the aluminum band used to attach it to the vans metal was also neglected and leaking. We removed it, did some fiberglass work, primed area with approved 2k primer paint (per neighbor) and researched using butyl tape as a seal. It was one of the best solution to seal the band to the fiberglass. It also was stitched down with aluminum screws. The rain gutter was in great shape except for some missing body seam sealer. We wired wheel it all and put a fresh coat on to spruce it up. When the painting was done we placed an automotive grade screw cap molding on band. No leaks!
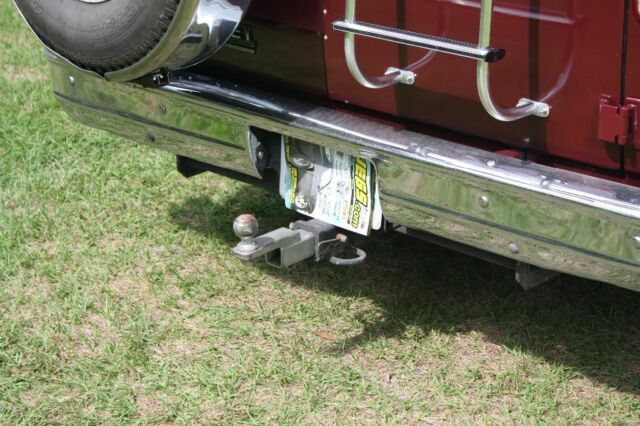
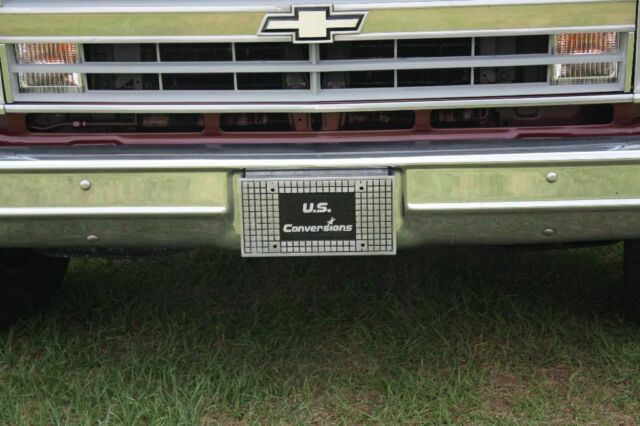
It has a new windshield with inner and outer gaskets along with a heavy bead of flowable glass sealer. No leaks! The w/wiper arms have a new coat of paint plus blades. All hoses, connection, pump for windshield fluid delivery system is new. The w/wiper motor upon inspection didn`t have any issues. Two red and two amber side markers lens (used) have been purchased online and new gasket material for the seals and new bulbs as well. The cyclops and two tail light lens are new. It has an aluminum ladder. A spare tire with cover (70% tread) Goodyear Wrangler, as well as the 4 brand new 235/75 r15 Goodyear's that are mounted on Aluminum American Directional 5 lug Sawblade Wheels. They have some pitting, but they are from the 90`s. Original bumpers have been polished with 0000 steel wool and waxed. Only a rusted base # to reference for license plate light, which turned out to be a 1969 Camaro license plate light, so now its part Camaro..lol
The grill up front had to be JB plastic welded back to life. A coat of primer and that plastic paint we used for the shroud's inside came out like brand new. We have been looking for this grill for better than a year now, (cant be found). The Chevy Bow Tie really needed serious help to bring back to life. Headlight bezels, headlights, all hardware and the amber turn signals lens are new. (USC) put a fold-away step on the bumper to make it easier for you to clean the windshield, what fart smellers they were. Side mirrors are new but you cant tell it. We called and complained about the surface rust, they said its normal wear and tear an no refund or exchange was due. The undercarriage has been scraped and coated with Rust-Oleum Rubberized undercoating.
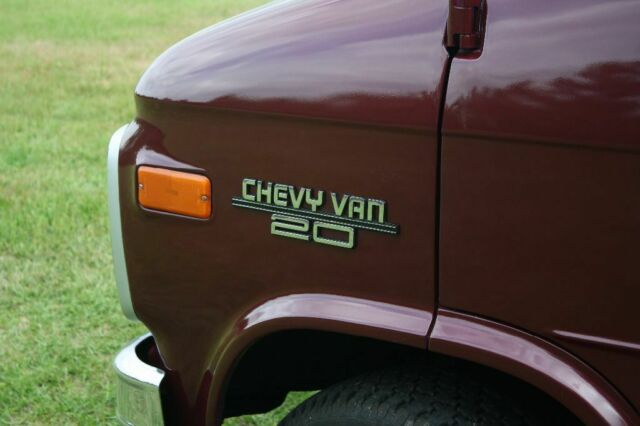
Both Chevy Van 20 emblems refurbished. Passenger side has a hole that was drilled and riveted at one time. They were so lazy they couldn`t raise the hood and do it right. Sorry, we had to vent because previous owner was a cob-jobber. Chevrolet emblem under spare refurbished as well. We have an extra (Chevy Van 20) emblem that's in ok shape.
The van had no weather stripping at all when we bought it. When the time came we had 4 new door pins and 8 bushings (driver and pass) installed. The Chevy dealer told us no serviceable pins on either set of cargo doors. Than we had the doors adjusted and weather stripping put on. They guaranteed that it wouldn't leak, btw its still under warranty
We also have a 30 amp 125 volt inlet wired with 10/3 to an electric panel inside for shore power. It has one (30)amp breaker and two (20) amp brakers.
~Mechanical~
Here is a list of what we have replaced and services we`ve had done by professionals.
Rebuilt Rear End (under warranty) less than 2000 miles
Remanufactured Transmission (under warranty) less than 2000 miles
Both Rear wheels new hubs and complete brake job
Drive shaft check out ok. New universal joints..sleeve on slip yoke
New flywheel cover
New brake rotors with loaded calipers and brake pads and hydraulic lines
New Moog tie-rods (inner & outer)
New Moog control arm bumpers
New upper control arms w/loaded ball joints
Refurbished lower control arms with bushing kit and professionally press in ball joints
Wheel spindle were in great shape. It look liked a new set of wheel bearings had just been put in, so somebody took care in that respect
New hubs with new wheel bearing (driver and pass)
New steering gear box (reman) and power steering pump w/new lines
New water pump, hoses and thermostat
New radiator with frame supports
New vapor canister
New starter
New alternator
Reman. air compressor, new evaporator-core and a receiver drier (previous owner) 3yrs old... We had the system charged and no problems. It blows cold!!!
Battery purchased 2/17
New belt tensioner
Tbi needed gasket (certified Mechanic)
New clutch fan
New egr solenoid
New distributor, cap, button, plugs, wires
New shocks
New air filter, also primed and painted cover and housing
New intake manifold gasket (mechanic said cylinder walls looked good)
New exhaust manifold stud kit on driver side at the donut gasket
We tracked down all grounds cleaned and reset them
We have the original emergency keys that came with the van
A Chilton 87` to 90` manual
A Haines 68` to 96` manual
The original owners manual with warranty info and maintenance schedule (Memorabilia)
Factory tire size 225/75 r15...currently running 235/75 r15
Transmission 4L60700R4
Rear End 28tooth spline 8.5 342 gear ratio.. open rear non-posi
We have a few extra that go with...foam gasket, wheel bearing grease, old headlight hardware, dash bulbs, atf, spare cowling map light, rear end grease, clamps, seam sealer, lug wrench, some bondo, brake fluid
 ONE OF A KIND - CUSTOM BUILT 1956 CHEVY BEL AIR - LS7 7.0L CHEVY CRATE ENGINE
Mileage: 000
 This 55 Chevy is one of a kind and is the definition of Hot Rod.
Mileage: 1,809
 1963 One of a Kind Chevy 2 Nova
Mileage: 240
 1960 CHEVY BISCAYNE 1 OF A KIND!! MUST SEE!
Mileage: 860
 1932 Chevy Ambulance One of a kind
 1948 Chevy Truck one of a kind must see loaded
Mileage: 9,999
 One of a Kind ! 1985 Chevy M1008 CUCV D30 / K30
Mileage: 52000
 One of a kind custom 1978 chevy camaro rat rod
Mileage: 119,000
 Unique Rat Rod, chevy 454 engine, one of a kind to say the least! Frankenstein
Mileage: 400




 1957 chevy bel-air - one of a kind pinball machine